Select More Items Contact Group. Under My Contacts select the folder where you want to save the contact group.
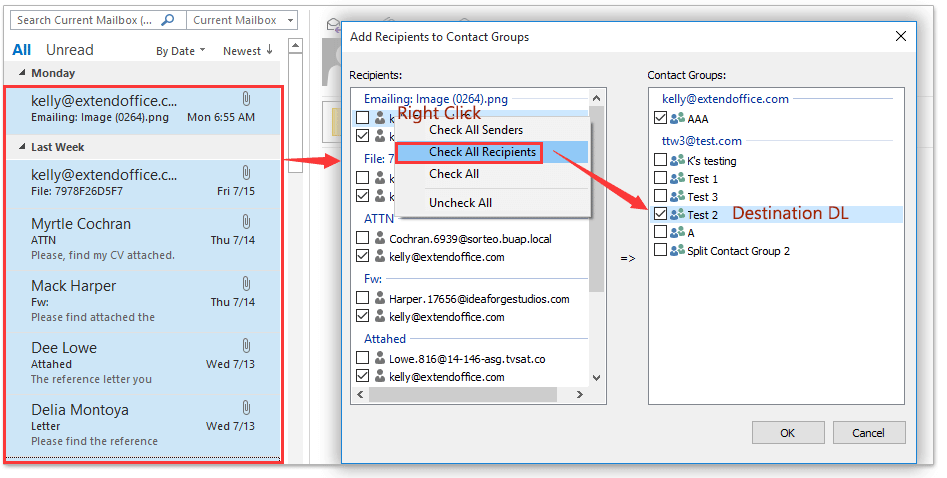
How To Add Multiple Emails Senders To Distribution List Contact Group In Outlook
Open Office 365 admin center and then navigate to GroupsGroups.

Create a distribution list in outlook. Open your Distribution List or create a new one via. Name and populate your Contact Group. Create a contact group or distribution list in Outlook for PC On the Navigation bar click People.
To create Outlook distribution list from an Excel file please do as follows. At the bottom of the left navigation pane select People. Select Contact Groups for New Items.
Select Settings Options Groups Distribution groups I own. Go to contact management in your Outlook application by clicking the People button in the navigation bar. Create and manage distribution groups shows the distribution groups that youre listed as an owner of.
Open Microsoft Outlook and create a new Email. If the New Contact List option is greyed out set your preferences to Show my On My Computer folders and then return to finish creating your contact list. Editing the Outlook distribution list is as easy as creating one.
Enter a name description and email alias for your new group and choose whether you want people outside your organization to send email to the group. Enter a name for the contact list. Sharesave contact group distribution list sent to you in Outlook If you received emails with shared contact groups you can copy and save the contact groups to your Contacts folder easily in Outlook.
On the new window that pops up find and click the New Members button. Or press Ctrl Shift L. Select From Address Book from the drop-down list to add members.
To create a distribution list follow these steps. You can do as follows to create distribution list from email recipients in Outlook. On the Home tab select New Contact List.
When the address book opens up click on the File menu item then choose New Entry We are creating a distribution list so you will need to choose New Contact Group. You can edit it while drafting an email or directly edit it from your Outlook contacts. To create a new group.
On the Choose a group type field choose Distribution and then choose Next. Under My Contacts in the sidebar on the right select the folder where you want to save the new contact. Select Groups Groups in the left navigation pane and then select Add a group.
Launch outlook 2013 or 2010 Click Home New Items. How to create a distribution list in Outlook 2010 After opening up Outlook 2010 head over to the menu ribbon and select the Contacts Tab. You can include contacts which you have already saved as an Outlook contact from the Windows Address Book or you can even create a new contact during the process.
In the Contact Group window place the cursor in the Name text box and type a name for the distribution list. Click More Items Contact Group 3. Select and copy all email addresses in the worksheet you need to create a distribution list based on.
Use it to create new groups and manage existing groups that you own. Create and use distribution list in outlook 1. On the Contact Group ribbon click Add Members.
Step By Step Process Of How To Create A Distribution List In Outlook Office 365 Admin Panel 1. Go to the Home tab and select New Items. Create a Contact GroupFirst open Outlook and navigate to the People tab using the people icon in the.
File- New- Distribution List or use the keyboard shortcut CTRLSHIFTL Press the Select Members button. In Select Members Contacts. You can find People in one of two places on the Navigation bar.
How to create employee distribution lists in Outlook Step one. Leave the Contact Group window open. Once the group has been created we need to add contacts to it so click on Add Members and then choose From Outlook Contacts from the drop down.
Creating distribution lists in Outlook 2013 and 2016 Step 1. Get into the email folder and double click to open the email you want to create distribution list from the recipients. Microsoft Outlook makes it very easy to create edit and maintain a distribution list as part of the Contacts area.
Select the New Contact dropdown arrow then select New contact list. Usually youll select Contacts. In the Mail view click to open the email containing the contact group attachments in the Reading Pane.
Go to the home page of the site. In the Add New Item dialog box from the installed templates select Visual C Item OfficeSharePoint and then choose Module.

Where To Find Web Part Pages In Sharepoint 2013 Youtube
To display calendar events here we create web part page and add calendar list.

Create web part page in sharepoint 2013. In the Save Location dropdown choose Site Pages. How to create a web part page in sharepoint 2013. Then it will open the web part categories in the ribbon.
Under Site Actions choose More Options Web Part Page Create. Create web part using visual studio 2015 SharePoint 2013. Click the Site Pages library or whichever library you want to hold your new Web Part page.
In the Add Web Parts dialog box here select the Apps Web Parts select the Splessonslist Web Part check box and then click Add. In the Add New Item dialog box expand the SharePoint node and then choose the 2010 node. Go to the Files tab expand the New Document drop-down list and click on the Web Part Page.
Click the Settings gear icon and choose Site Contents. Web Part used to store particular contentinformation ie. In the New Web Part Page screen provide a Name for the web part.
Enter the Name for your new web part page select the page Layout and Save Location and then click on Create button. When a SharePoint user loads a web part page SharePoint gets it by parsing the path to its template page content and context. Click the New Document drop-down list on the left of the Ribbon and select Web Part.
You can create many sites as a matter of fact the more the better. Select the web part page layout. Think of a SharePoint site as a room with furniture.
Go to the Sharepoint site page and click Edit Page. Choose a zone for the Web Part and then click Add a Web Part in that zone. It also sets the web parts associated with the web part page assigns a WebPartCollection instance to the page and populates the web part page and its web parts with content.
The Add Web Parts Web Page dialog box opens. Documents events contacts. Finally the custom web part was added to the site page.
How to create a web part page in sharepoint 2016. A site is essentially a workspace with various web parts like document libraries calendar task list etc. Responsive Calendar Web Part.
Click the Files tab of the Ribbon. If you do not see the site page that you want click Site contents on the Quick Launch bar in the list of contents click Site Pages and then click. Sites used to organize various types of content web parts Pages used to display content web parts on a site.
Select New and then select Page. From the web part categories select Custom and there you can see our demo web part like below. Create custom web part in sharepoint 2013.
A page is just a means to visualize content on a given siteSay you create a site for the Human Resources department. Create custom visual web part sharepoint 2013 Now you can open your SharePoint 2013 site and edit the page where you want to add your custom visual web part. Then select the Document library where you want to Save the newly created web part page.
In the Name box specify a name for the web part and then choose the Add button. The web part appears in Solution Explorer. To create a new Web Part page.
To create a web part page in SharePoint 2013 Follow these steps. Sharepoint web parts examples. To put everything in simple terms SharePoint consists of 3 major building blocks.
Now edit page in SharePoint designer and add the following CSSto the page. I added the Web Part Page content type and created a page in the Pages library. Go to the page where you want to add a web part.
How to create a web part page in sharepoint 2013 programmatically Then Right-click on the Project then Add - Add new project. Select the web part and click on Add. The article page gives preset layouts but they arent true web part pages that you would get in the Site Pages library.
Click Add Web Part then select Custom from the Categories menu item then choose your custom web part then click Add. Go to your SharePoint site Navigate to Site Pages library - Click on Site Contents link from Left navigation Click on Site Pages library. Or your iPhone with apps web parts.
Alternately you can go to an existing page select New and select Start from a blank page. Or you can choose Copy of this page to create a new page that has the same web parts and content as the existing page. Learn how to add edit and move web parts in SharePoint 2013.
Didnt see it in the ribbon there either. What are SharePoint Sites Pages and Web Parts. Give a name for the Module as shown in the fig below.
Step 7 Click the Stop editing menu to save the changes. If the page is not already in edit mode click Edit at the top right of the page. When you click on Add web part you will be able to see your custom web part under Custom web part categories like below.
In the list of SharePoint templates choose Web Part. First we need to create calendar list and add some sample events. You now have a web part page in the Site Pages library.